
Add 'login with Intercom' via Netlify Functions & OAuth!
- About the project
- How to install and setup
- Running the project locally
- Deploying
- How it works with Netlify Functions
This project sets up a "login with Intercom" OAuth flow using netlify functions.
Here is a quick demo of the login flow, and the OAuth Access data you get back:

You can leverage this project to wire up Intercom (or other OAuth providers) login with your application.
<iframe width="560" height="315" src="https://www.youtube.com/embed/zErvY08uNM0" frameborder="0" allow="autoplay; encrypted-media" allowfullscreen></iframe>TLDR; Watch the 11 minute video explaining everything
Let's get started with how to get setup with the repo and with Intercom.
-
Clone down the repository
git clone git@github.com:DavidWells/intercom-netlify-oauth.git
-
Install the dependencies
npm install
-
Create an Intercom OAuth app
Lets go ahead and setup the Intercom app we will need!
Create an Intercom OAuth app here
You need to enable a 'test' app in your account. It's a tricky to find but you can create a TEST app in your Intercom account under
Settings > Generalhttps://app.intercom.com/a/apps/your-app-id/settings/general
After enabling the test app, you can find it listed in your intercom developer portal.
We now need to configure the test app.
Input the live "WEBSITE URL" and "REDIRECT URLS" in the app edit screen.

You will want to have your live Netlify site URL and
localhost:3000setup to handle the redirects for local development.If you haven't deployed to Netlify yet, just insert a placeholder URL like
http://my-temp-site.combut remember to change this once your Netlify site is live with the correct URLOur demo app has these
REDIRECT URLSvalues that are comma separatedhttps://intercom-login-example.netlify.com/.netlify/functions/auth-callback, http://localhost:3000/.netlify/functions/auth-callback
Great we are all configured over here.
-
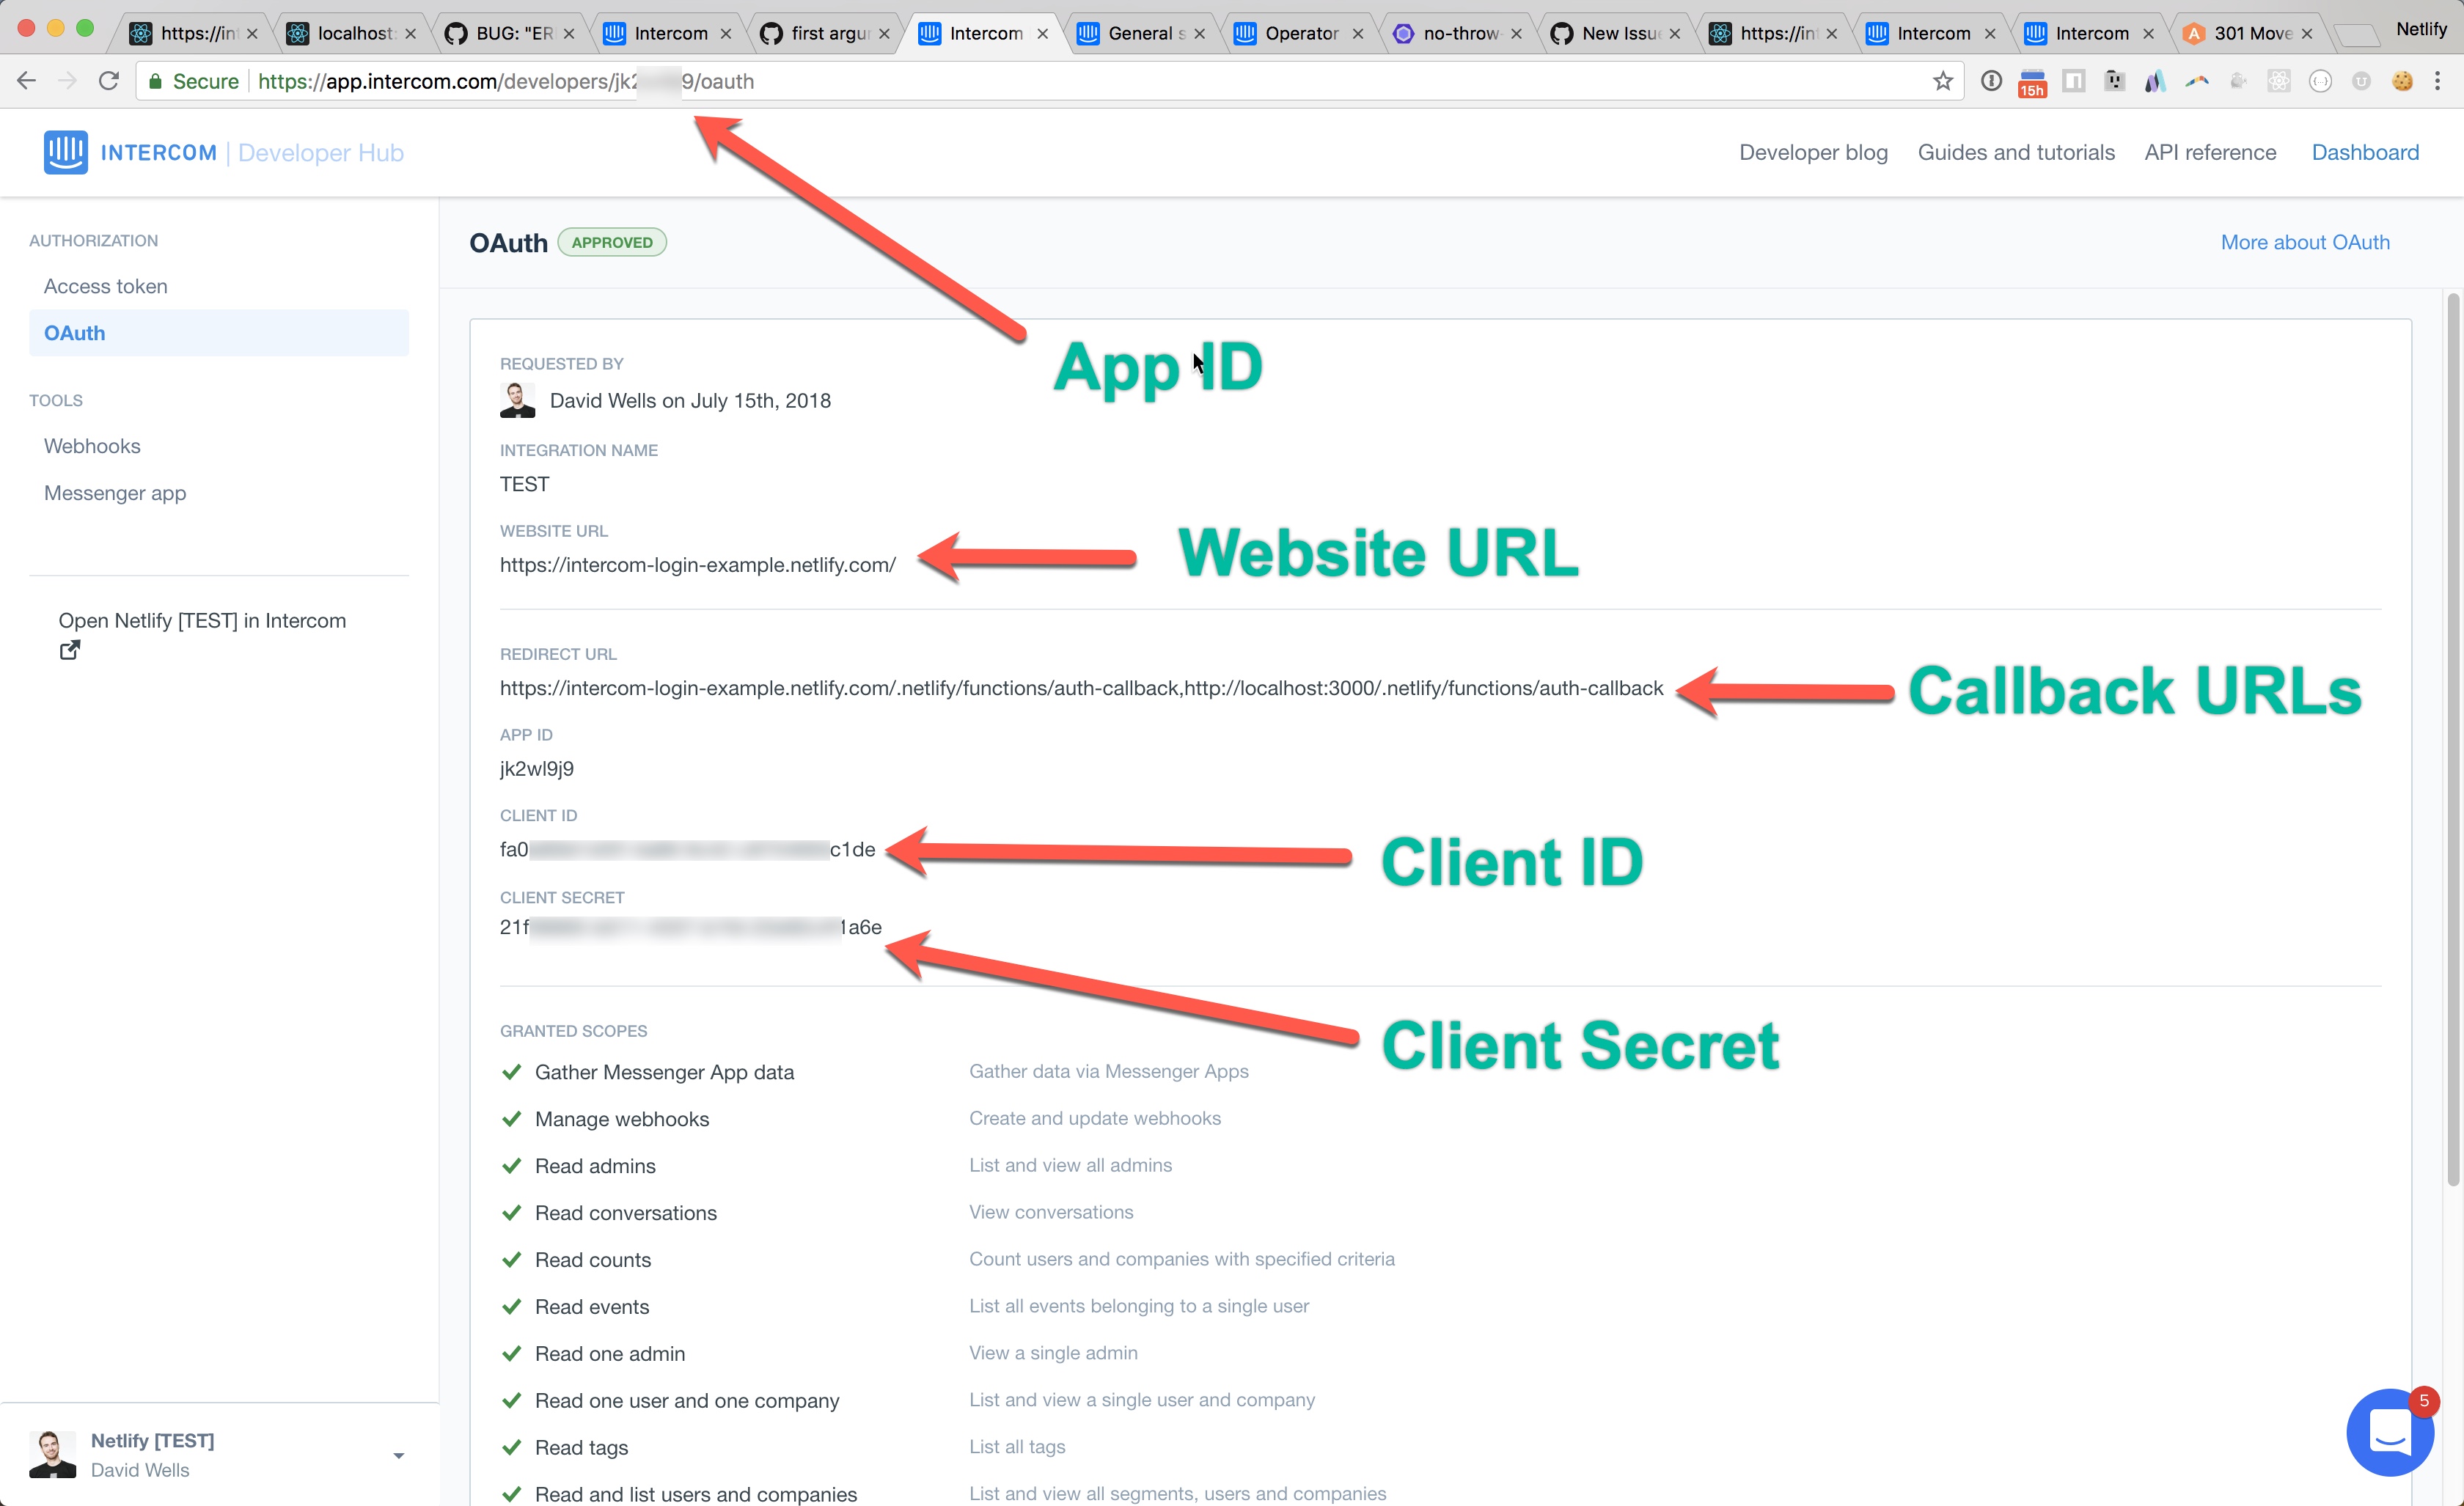
Grab your the required config values
We need our Intercom app values to configure our function environment variables.
Navigate back to the main OAuth screen and grab the App ID, Client ID, and Client Secret values. We will need these to run the app locally and when deploying to Netlify.
Because we are using netlify-lambda to build & serve functions locally, we can work on this project without needing to redeploy to reflect changes!
We need to set an Intercom app id and OAuth client id + secret in your terminal environment for the functions to connect to your Intercom app.
After creating and configuring your Intercom OAuth app, it's time to plugin the required environment variables into your local terminal session.
On linux/MacOS, run the following command in your terminal:
export INTERCOM_APP_ID=INTERCOM_APP_ID
export INTERCOM_CLIENT_ID=INTERCOM_CLIENT_ID
export INTERCOM_CLIENT_SECRET=INTERCOM_CLIENT_SECRET
If you are on a window machine, set the environment variable like so:
set INTERCOM_APP_ID=INTERCOM_APP_ID
set INTERCOM_CLIENT_ID=INTERCOM_CLIENT_ID
set INTERCOM_CLIENT_SECRET=INTERCOM_CLIENT_SECRET
Then run the start command
npm startThis will boot up our functions to run locally for development. You can now login via your Intercom application and see the token data returned.
Making edits to the functions in the /functions will hot reload the server and you can iterate on building your custom logic.
Use the one click "deploy to Netlify" button to launch this!
Alternatively, you can connect this repo with your Netlify account and add in your values.
In https://app.netlify.com/sites/YOUR-SITE-SLUG/settings/deploys add the INTERCOM_APP_ID, INTERCOM_CLIENT_ID, and INTERCOM_CLIENT_SECRET values to the "Build environment variables" section of settings

After your site is deployed, you should be able to test your Intercom login flow.
Once again, serverless functions come to the rescue!
We will be using 2 functions to handle the entire OAuth flow with Intercom.
Here is a diagram of what is happening:
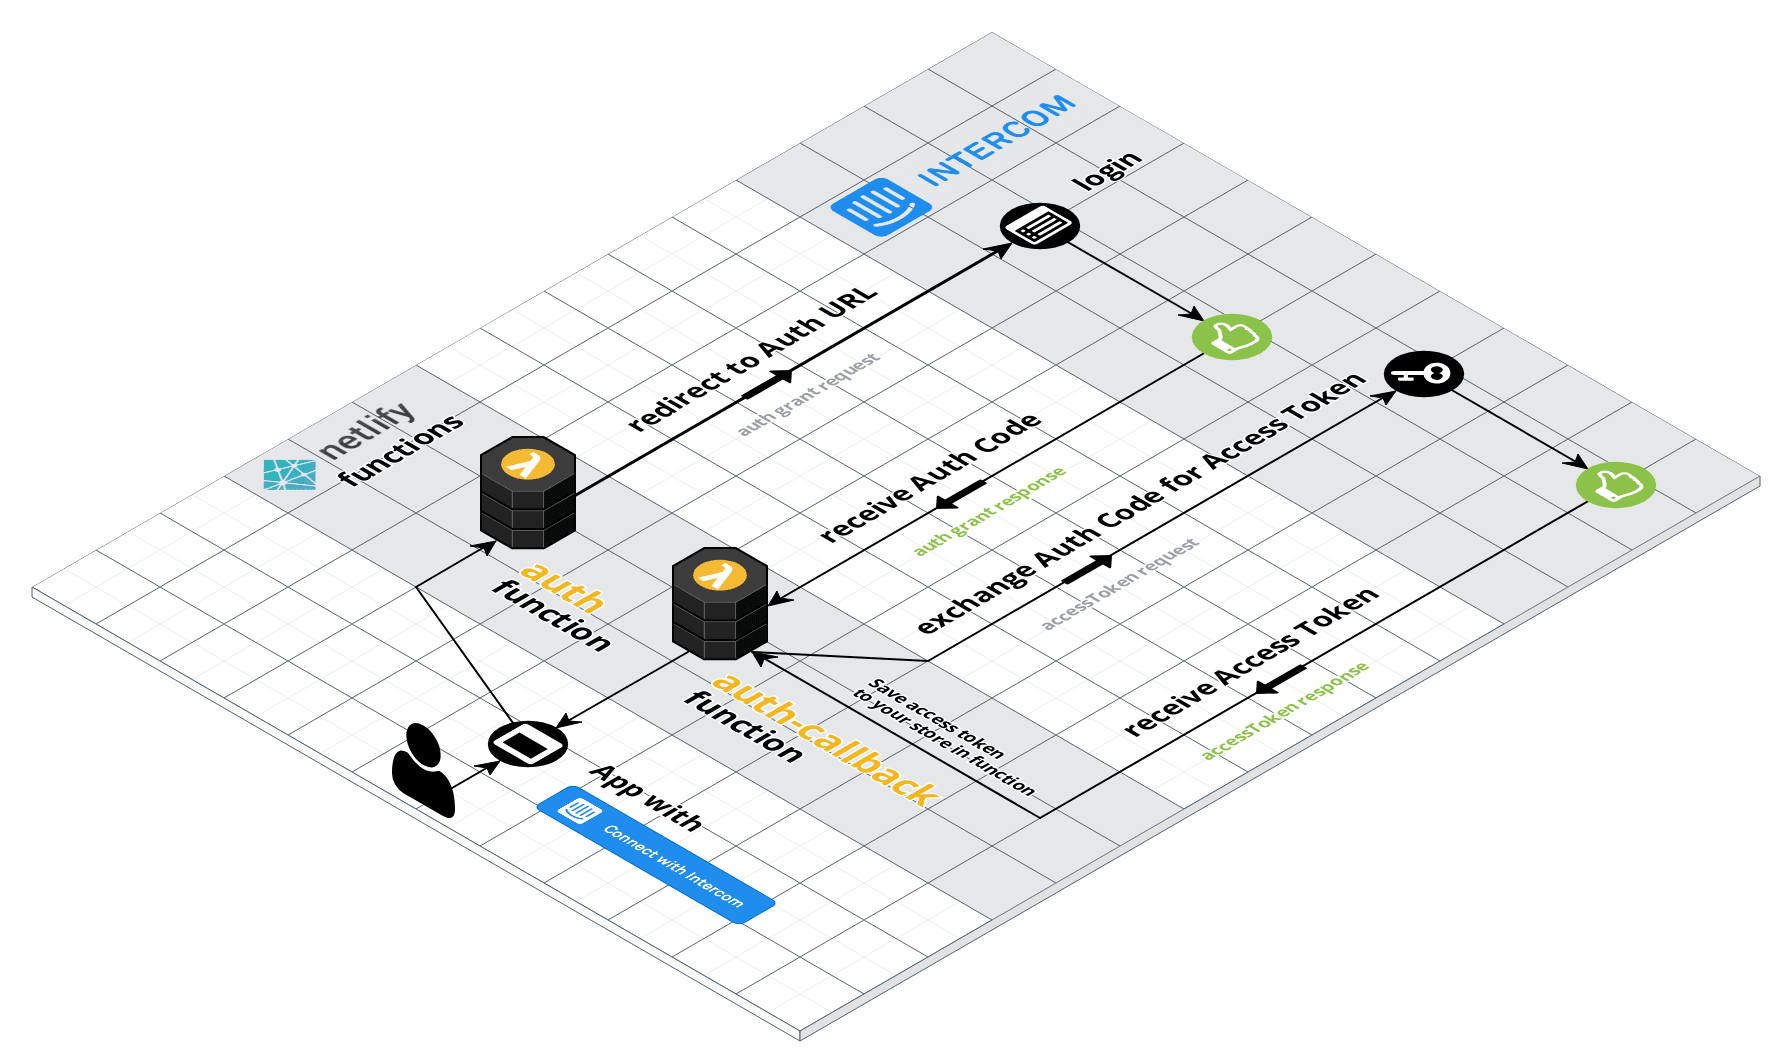
- First the
auth.jsfunction is triggered & redirects the user to Intercom - The user logs in via Intercom and is redirected back to
auth-callback.jsfunction with an auth grant code auth-callback.jstakes the auth grant code and calls back into Intercom's API to exchange it for an AccessTokenauth-callback.jsnow has the AccessToken to make any API calls it would like back into the Intercom App.
This flow uses the Authorization Code Grant flow. For more information on OAuth 2.0, Watch this video
Let's dive into the individual functions and how they work.
The auth.js function creates an authorizationURI using the simple-oauth2 npm module and redirects the user to the Intercom login screen.
Inside of the auth.js function, we set the header.Location in the lambda response and that will redirect the user to the authorizationURI, a.k.a the Intercom oauth login screen.
/* code from /functions/auth.js */
import oauth2, { config } from './utils/oauth'

/* Do initial auth redirect */
exports.handler = (event, context, callback) => {
  /* Generate authorizationURI */
  const authorizationURI = oauth2.authorizationCode.authorizeURL({
    redirect_uri: config.redirect_uri,
    /* Specify how your app needs to access the user’s account. http://bit.ly/intercom-scopes */
    scope: '',
    /* State helps mitigate CSRF attacks & Restore the previous state of your app */
    state: '',
  })

  /* Redirect user to authorizationURI */
  const response = {
    statusCode: 302,
    headers: {
      Location: authorizationURI,
      'Cache-Control': 'no-cache' // Disable caching of this response
    },
    body: '' // return body for local dev
  }

  return callback(null, response)
}The auth-callback.js function handles the authorization grant code returned from the successful Intercom login.
It then calls oauth2.authorizationCode.getToken to get a valid accessToken from Intercom.
Once you have the valid accessToken, you can store it and make authenticated calls on behalf of the user to the Intercom API.
/* code from /functions/auth-callback.js */
import getUserData from './utils/getUserData'
import oauth2, { config } from './utils/oauth'

/* Function to handle intercom auth callback */
exports.handler = (event, context, callback) => {
  const code = event.queryStringParameters.code
  /* state helps mitigate CSRF attacks & Restore the previous state of your app */
  const state = event.queryStringParameters.state

  /* Take the grant code and exchange for an accessToken */
  oauth2.authorizationCode.getToken({
    code: code,
    redirect_uri: config.redirect_uri,
    client_id: config.clientId,
    client_secret: config.clientSecret
  })
    .then((result) => {
      const token = oauth2.accessToken.create(result)
      console.log('accessToken', token)
      return token
    })
    // Get more info about intercom user
    .then(getUserData)
    // Do stuff with user data & token
    .then((result) => {
      console.log('auth token', result.token)
      // Do stuff with user data
      console.log('user data', result.data)
      // Do other custom stuff
      console.log('state', state)
      // return results to browser
      return callback(null, {
        statusCode: 200,
        body: JSON.stringify(result)
      })
    })
    .catch((error) => {
      console.log('Access Token Error', error.message)
      console.log(error)
      return callback(null, {
        statusCode: error.statusCode || 500,
        body: JSON.stringify({
          error: error.message,
        })
      })
    })
}
Using two simple lambda functions, we can now handle logins via Intercom or any other third party OAuth provider.
That's pretty nifty!